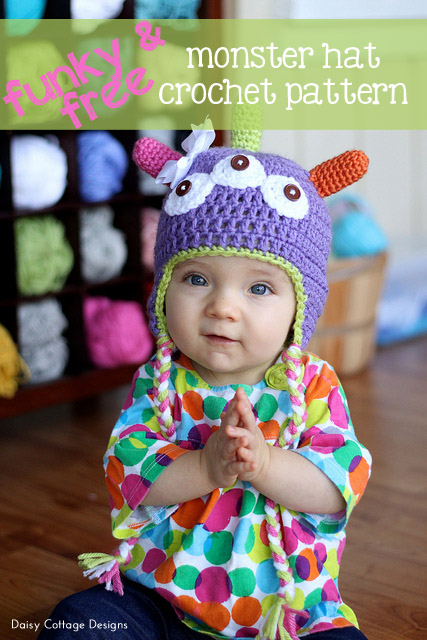
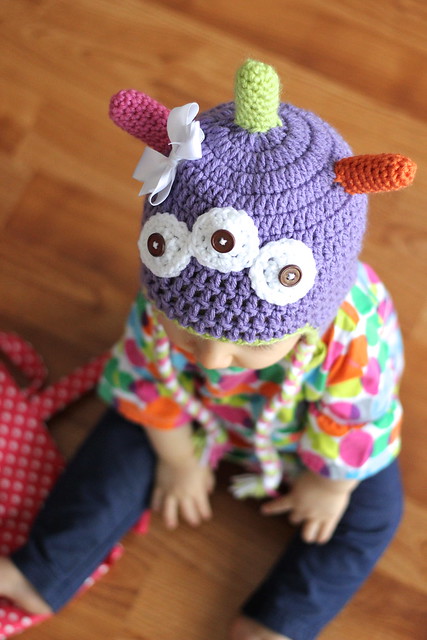
I've had this idea in my head for a while, but I'm just now getting around to it. This hat is available in all sizes here in the shop, but I wanted to share the 6-12 month pattern with you. I know there are lots of monster hat patterns out there, but I thought I'd share my take on the idea. I had the opportunity to get a few shots of Caroline modeling the hat this morning.
The 6-12 month size should fit babies whose heads measure 16-18 inches. Caroline's head measures right at 18".
To make this cute little monster hat, you'll need the following:
- Cotton or Acrylic Yarn in a worsted weight (You'll need one main color and small bits of coordinating yarn)
- I and H crochet hooks
- Tapestry Needle
- Poly Fill or cotton balls
- Buttons for the eyes
- A bow or crocheted flower for embellishment
- An adorable baby

Note: This hat is seamless. There are no chains or slip stitches until you reach the earflaps.
Hat Pattern (Use an I hook for the hat)
Ch 2.
Round 1: 8 sc into the first chain. (8)
Round 2: 2 dc into each stitch. (16)
Round 3: 2 dc into each stitch. (32)
Round 4: *1 dc into the next stitch, 2 dc into the next stitch* around.
Rounds 5-12: dc in each stitch around. Sl st into the first stitch of the last round.
Stop here and add one round of sc if you want a beanie. If you'd like an earflap hat, keep going without cutting yarn.
Earflap Directions:
Ch 1.
Row 1: hdc in the same stitch and in the next 11 stitches, turn. (12)
Row 2: hdc 2 together, hdc in the next 8 stitches, hdc 2 together. Ch 1, turn. (10)
Row 3: hdc 2 together, hdc in the next 6 stitches, hdc 2 together. Ch 1, turn. (8)
Row 4: hdc 2 together, hdc in the next 4 stitches, hdc 2 together. Ch 1, turn. (6)
Row 5: hdc 2 together, hdc in the next 4 stitches, hdc 2 together. Ch 1, turn. (4)
Row 6: hdc in each stitch across. Ch 1, turn. (4)
Row 7: hdc 2 together, hdc 2 together. Fasten off. (2)
You will now need to work the second earflap. On the front of the hat, skip 13 stitches and begin the second earflap by joining the yarn with a sl st. You will work it exactly as you did the one above.
Final Row: After working the second earflap, single crochet evenly around the entire hat. Work 2 sc into the corner stitches of the earflaps. Fasten off and weave all ends.
(From here on out, use the H hook)
Eyes (3):
Ch 3.
Row 1: 8 dc into the first ch. Join with a sl st to the first dc (NOT in the chain). Ch 1. (8)
Row 2: 2 hdc into the first stitch and in each stitch around. Join with a sl st to the first dc (NOT in the chain). Fasten off. (16)
Leave a long tail for sewing on the hat.
Leave a long tail for sewing on the hat.
Horns (3):
Ch 2.
Row 1: 5 sc into the first ch. (5)
Row 2: 2 sc into each stitch. (10)
Rows 3-10 (or as long as you want them): sc in each stitch around. Sl st in the next stitch. (10)
Fasten off and leave a long tail for sewing onto the hat. Stuff the horns with poly fill so they stand up
Braids:
For each side of the hat, cut 9 strands of yarn (I usually do 3 strands of each of 3 different colors) approximately 40 inches long. Fold them in half and pull the "loop" through the hat. Pull the loose ends through the loop to attach the yarn to the hat.
I hope you enjoy this pattern! You are welcome to make items from this pattern to sell or give away, but I do ask that you include this text in your listings: Pattern written by Lauren Brown of Daisy Cottage Designs.
Also, if you make the hat, I'd LOVE to see it. Use the hashtag #daisycottagedesigns on Instagram so I can check them out.
Also, if you make the hat, I'd LOVE to see it. Use the hashtag #daisycottagedesigns on Instagram so I can check them out.


lol that is the cutest hat
ReplyDeleteCan't wait to try it out!
ReplyDeleteAnnie
I just found you through another blog..that has is just awesome. I looked through some of your previous posts. You have truly been blessed. May you always find the joy. Blessings
ReplyDeleteThis is really cute! Definitely make one of these for my nephew :)
ReplyDeleteLove your beanie Lauren! Caroline is so adorable :)
ReplyDeleteOh my gosh I love it, too cute!
ReplyDeleteI featured this on my blog today! You can check it out and grab a button here: http://practicallyfunctional.net/2013/01/the-fun-in-functional-link-party-34/
DeleteThank you for sharing! I am happy to see another sister in Christ! Nice to meet you :)
ReplyDeleteIs the F hook for the hat and H for the eyes?
ReplyDeleteso cute. i added it to the directory at crochetatplay.
ReplyDeleteI hope the links brings you lots of traffic
we have over 22,000 free patterns and are growing every day
Hi ^^
ReplyDeleteI'm french so excuse me if you don't really understand what i said.
I really love that, and i did one but, just when i've started the row i think, my hat started to "warp" (i'm not sure for the last word).
Is it normal ?