
Since starting this series, this is the number one question I have received: "Do you have any tips for taking better photos?" We all know that great photos sell products. Let's just face it, a dark, blurry photo isn't going to help bring in buyers. Crisp, clear photos can do just that. Here are my tips for taking compelling images of your products.
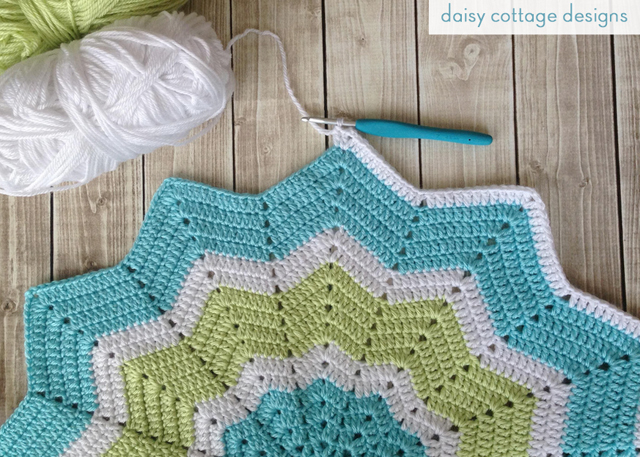
You don't need fancy equipment. You don't have to have a fancy DSLR and 4 lenses to take awesome photos of your products. The photo above was taken with my cell phone. Sure, it helps to have a good camera, and I'm thankful for mine. I have a Canon 60D and two great lenses - the Nifty Fifty
 and a Tamron 28-75mm macro lens
 . But even if all you have is an iPhone or point and shoot, you can still take great photos. I often use my iPhone 5
 to take photos of items for Etsy and even my blog.
Use natural light. Repeat after me: "I will not use flash. Flash is not for me." Unless you have a fancy off-camera flash or a diffuser of some sort, flash is not your friend. Flashes have a way of creating weird shadows and unusual color. I know there are extenuating circumstances, but I'm sure there's a time of day when you can shoot in natural light. Put your back to a window and shoot away.
Avoid cluttered backgrounds. Believe me, I know how tough this one can be. I have two little girls that love to clutter. They're wonderful at pulling out various things and scattering them around my house. You don't have to have a spotless house to take great photos, but be sure to clear the frame before snapping your shots. I find that using scrapbook paper works great for backgrounds for small items.
Take shots from different angles. Some people like artsy photos. They'd love to see a blurred background and a funky angle. Some people like very traditional, straight on pictures. Use a variety of photos in your shop to bring in a variety of people. Be sure to use your camera's macro setting when taking closeups.

Have a cohesive look. This might seem like it contradicts the suggestion above, but it really doesn't. Use similar backgrounds, use similar colored items on your front page, and make sure all images are bright and crisp.
Take a lot of photos. When I take photos of a new item for the blog or the shop, I take tons of photos. We're talking up to 200. I take pictures at different angles, on different backgrounds, and using various settings. When I upload them to my computer, I select 4-8 of the best photos and go from there. If nothing catches my eye, I'll go through the whole process again. Sure, it takes time, but it will pay off in the long run.
Edit your images to make them better. Most of the beautiful images you see on Etsy, Pinterest, and blogs aren't straight out of the camera images. They've been tweaked and doctored using programs such as Photoshop Elements. While you might not want to pay for an expensive program, there are some free and inexpensive online alternatives. My favorite online option is PicMonkey. I have the Royale version, and I think it's fully worth the money.

Do your best to truly represent your item. If there's a small flaw, don't edit it out. Try to make the colors look as true to life as you possibly can. If possible, use an item in the photo to help people get an idea of the size of your item - your hand, a crochet hook, a mug. Sometimes reading 2 inches across doesn't have the same effect as showing the item in your hand.
If your really struggle with photography, consider trading with a photographer. In the beginning, I felt that my photography was really holding me back. With two very small children, I didn't have time to fiddle as much with photography as I wanted to. I would trade hats for photographs. I sent my products to a professional photographer (I've used local professionals and photographers that live in other states) in exchange for several images. After a while, I got confident with my picture taking skills and started doing this less and less. I still do this occasionally if I don't have a model in the right size.

If you've enjoyed these suggestions, be sure to check out the other posts in the Etsy 101 series. If you need tips on pricing your items, see this post.
This post contains affiliate links. These links help me bring more free and beautiful patterns to the blog!

Thanks so much for this series of posts! Very helpful article as usual :)
ReplyDeleteThis series has been perfect timing for me...and right before I read this post guess what I was doing?? Taking pics...but now will be waiting for my natural light!!!
ReplyDeleteLauren, your pictures are gorgeous so I will take your advice! I've thought of getting a macro lens - it doesn't zoom at all, right? My photographer friend only shoots with a macro lens and swears by it.
ReplyDeleteThis is a great post! Thanks for sharing :)
ReplyDeleteThank you so much for sharing your tips! Especially that one about photo editor! Your blog is fabolous and so much inspiring!
ReplyDeleteGreetings from Poland :)
If you like, please visit us on:
https://www.facebook.com/matuszkaijaguszka
This is the point that I was simply looking for. I'm quite happy and very much benefited by knowing about the way of to take pictures for Etsy. Thanks mate :)
ReplyDeletePhotoshop clipping path