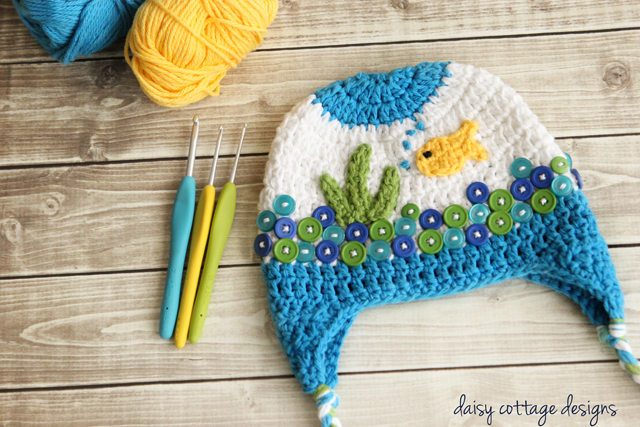
You may have seen the fishbowl hat I posted on Saturday. Thanks so much for all the sweet compliments I've received on it. Due to how cute everyone seems to think it is, I have added three more sizes so you can make this adorable little hat for more kiddos in your life.
If you'd like to make your own, it's easy. The most difficult part will be sewing on all those adorable buttons.
Materials:
- Worsted Weight Yarn (turquoise or blue and white) - I used 100% cotton
- small amounts of green and yellow or gold worsted weight yarn
- Favorite Findings Buttons (434 - Blue Ocean)
- thread for sewing on buttons
- tapestry needle
Notes:
Chains do NOT count as the first stitch.
- thread for sewing on buttons
- tapestry needle
Notes:
Chains do NOT count as the first stitch.

Newborn Hat
up to 14"
Ch 2.
Round 1: 6 sc into the first chain. Sl st to the top of the first sc. ch 2. (6)
Round 2: 2 dc into each stitch. sl st to the top of the first dc. Cut yarn and weave ends. (12)
Round 3: Join white yarn with a sl st. Ch 2. 2 dc into each stitch. sl st to the top of the first dc. ch 2. (24)
Round 4: 1 dc in the same stitch, 2 dc in the next. *1 dc into the next stitch, 2 dc into the next stitch* around. Sl st to the top of the first dc. ch 2. (36)
Round 5‐8: dc in each stitch around. Sl st to the top of the first dc. Cut
yarn and weave ends. (36)
Round 9: Join blue yarn with a sl st. Ch 2, dc in each stitch around. Sl st to
the top of the first dc. (36)
Round 10: dc in each stitch around. Sl st to the top of the first dc. (36)
Round 10: dc in each stitch around. Sl st to the top of the first dc. (36)
Stop here and add one round of sc if you want a beanie. If you’d like an earflap hat, keep going
without cutting yarn.
Earflap Directions:
Ch 1.
Row 1: hdc in the same stitch and in the next 8 stitches. Ch 1, turn. (9)
Row 2: hdc 2 together, hdc in the next 5 stitches, hdc 2 together. Ch 1, turn. (7)
Row 3: hdc 2 together, hdc in the next 3 stitches, hdc 2 together. Ch 1, turn. (5)
Row 4: hdc in each stitch across. Ch 1, turn. (5)
Row 5: hdc 2 together, hdc in the next 1 stitch, hdc 2 together. Ch 1, turn. (3)
Row 6: hdc in each stitch across. Cut yarn and weave ends. (3)
You will now need to work the second earflap. On the front of the hat, skip 10 stitches and begin the second earflap by joining yarn with a sl st. You will work it exactly as you did the one above.
Single crochet evenly around the entire hat working two stitches in the corners of the earflaps.
Proceed to the “finishing touches” section of the pattern. Use an F hook to make your goldfish appliqué and “grass.”
0 – 6 Months Hat
14-16"
Ch 2.
Round 1: 7 sc into the first chain. sl st to the top of the first sc. Ch 2. (7)
Round 2: 2 dc into each stitch. Sl st to the top of the first dc. Ch 2. (14)
Round 3: 2 dc into each stitch. Sl st to the top of the first dc. Cut yarn and weave ends. (28)
Round 4: Join white yarn with a sl st. Ch 2, work one dc into the same st, 2 dc in the next. *1 dc into the next stitch, 2 dc into the next stitch* around. Sl st to the top of the first dc. Ch 2. (42)
Round 5‐9: dc in each stitch around. Ch 2. (after row 9, cut yarn and weave ends). (42)
Round 10: Join blue yarn with a sl st. Ch 2. Dc in the same stitch and in each stitch around. Sl st to the top of the first dc. Ch 2. (42)
Round 11: dc in each stitch around. Sl st to the top of the first dc. (42)
Stop here and add one round of sc if you want a beanie. If you’d like an earflap hat, keep going without cutting yarn.
Earflap Directions:
Ch 1.
Row 1: hdc in the same stitch and in the next 9 stitches. Ch 1, turn. (10)
Row 2: hdc 2 together, hdc in the next 6 stitches, hdc 2 together. Ch 1, turn. (8)
Row 3: hdc 2 together, hdc in the next 4 stitches, hdc 2 together. Ch 1, turn. (6)
Row 4: hdc 2 together, hdc in the next 2 stitch, hdc 2 together. Ch 1, turn. (4)
Row 5: hdc in each stitch across. Ch 1, turn. (4)
Row 6: hdc 2 together, hdc 2 together. Cut yarn and weave ends. (2)
You will now need to work the second earflap. On the front of the hat, skip 12 stitches and begin the second earflap by joining yarn with a sl st. You will work it exactly as you did the one above.
Single crochet evenly around the entire hat working two stitches in the corners of the earflaps.
Proceed to the “finishing touches” section of the pattern. Use an F hook to make your goldfish appliqué and “grass.”

1-3 Years Hat
18-21"
Ch 2.
Round 1: 9 sc into the first chain. Sl st to the top of the first sc. ch 2 (9)
Round 2: 2 dc into each stitch. Sl st to the top of the first dc. ch 2. (18)
Round 3: 1 dc in the same stitch, 2 dc into the next stitch. *1 dc into the next stitch, 2 dc into the next stitch* around. Sl st to the top of the first dc. ch 2. (27)
Round 4: 1 dc in the first two stitches, 2 dc into the next stitch. *1 dc into the next 2 stitches, 2 dc into the next stitch* around. Sl st to the top of the first dc. Cut yarn and weave ends. (36)
Round 5: Join white yarn with a sl st. Ch 2. 1 dc in the same stitch and in the next two stitches, 2 dc in the next stitch. *1 dc into the next 3 stitches, 2 dc into the next stitch* around. Sl st to the top of the first dc. Ch 2. (45)
Round 6: 1 dc in the first 4 stitches, 2 dc in the next stitch. *1 dc into the next 4 stitches, 2 dc into the next stitch* around. Sl st to the top of the first dc. Ch 2. (54)
Rounds 7‐11: dc in each stitch around. Sl st to the top of the first dc. Ch 2. At the end of round 11, cut yarn and weave ends. (54)
Round 12: Join blue yarn with a sl st. Ch 2, dc in each stitch around. Sl st to the top of the first dc. Ch 2. (54)
Round 13: dc in each stitch around. Sl st to the top of the first dc. (54)
Stop here and add one round of sc if you want a beanie. If you’d like an earflap hat, keep going without cutting yarn.
Earflap Directions:
Ch 1.
Row 1: hdc in the same stitch and in the next 12 stitches. Ch 1, turn. (13)
Row 2: hdc 2 together, hdc in the next 9 stitches, hdc 2 together. Ch 1, turn. (11)
Row 3: hdc 2 together, hdc in the next 7 stitches, hdc 2 together. Ch 1, turn. (9)
Row 4: hdc 2 together, hdc in the next 5 stitches, hdc 2 together. Ch 1, turn. (7)
Row 5: hdc 2 together, hdc in the next 3 stitches, hdc 2 together. Ch 1, turn. (5)
Row 6: hdc in each stitch across. Ch1, turn. (5)
Row 7: hdc 2 together, hdc in the next stitch, hdc 2 together. Cut yarn and weave ends. (3)
You will now need to work the second earflap. On the front of the hat, skip 16 stitches and begin the second earflap by joining yarn with a sl st. You will work it exactly as you did the one above.
Single crochet evenly around the entire hat working two stitches in the corners of the earflaps. Cut yarn and weave all ends.
Proceed to the “finishing touches” section of the pattern. Use an H hook to make your goldfish appliqué and “grass.”
Finishing Touches:
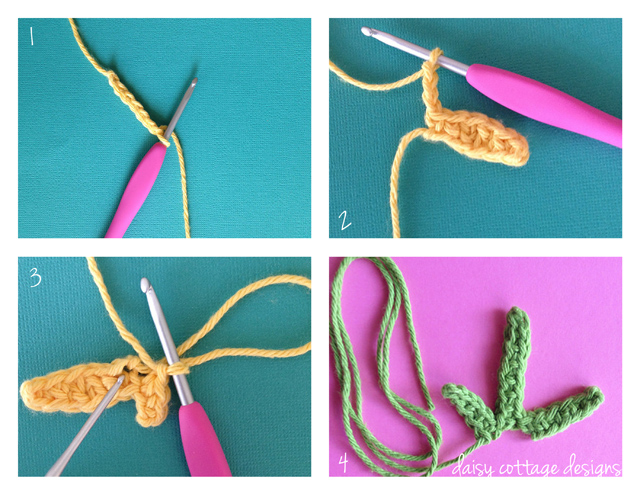
Goldfish Appliqué
Using the hook specified above and yellow/gold yarn, ch 7 (photo 1).
Row 1: sc in the second ch from hook. hdc in the next, dc in the next 2 stitches, hdc in the next, sc in the next. ch 3. sc in the second ch from hook, hdc in the next. sl st in the same stitch. (Photo 2)
Row 2: ch 3. sc in the second ch from hook, hdc in the next. Sl st in the BACK of the first stitch on the opposite side of the fish (photo 3). hdc in the next stitch, dc in the next 2 stitches, hdc in the next stitch, sc in the next. ch 1, sl st to the first stitch of the previous row. Cut yarn and leave a long tail for sewing on the hat.
Grass Appliqué (see photo 4):
Using green yarn the hook specified above, ch 7 (9 for 1-3 year size).
sl st in the second ch from the hook. sc in the next 5 (7) stitches. Do not cut yarn.
ch 10 (12). sl st in the second ch from hook. sc in the next 8 (10) stitches. Do not cut yarn.
ch 6 (8). sl st in the second ch from hok. sc in the next 4 (6) stitches. Cut yarn leaving a long tail for sewing on the hat. When you're finished you should have three "blades of grass" as shown in photo 4 above.
Braids:
For each side of the hat, cut 9 strands of yarn (I do three strands of 3 different colors) approximately 40 inches long. Fold them in half and pull the "loop" through the hat. Pull the loose ends through the loop to attach the yarn. Separate each color to make three strands. Then braid and knot at the end to secure. Cut yarn to make the ends even.
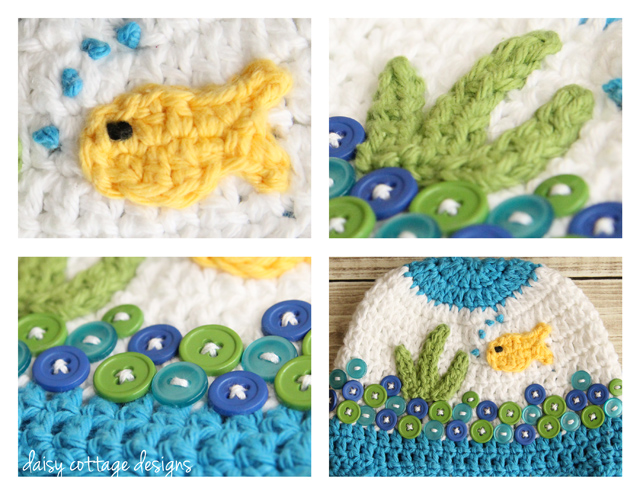
Once you have your hat made and the grass and goldfish finished, you'll need to sew on your buttons. I suggest placing them on the hat first to see how you're going to want them arranged. After you've sewn on the buttons, use a tapestry needle to sew on the grass and fish. I used a french knot to make the eye on the fish and the bubbles coming up from his mouth. This is a great tutorial on how to make French knots on crocheted or knitted items.


Every time I look at this hat, it the cutest hat I have ever seen!! Your design is just adorable!! Thanks for sharing with all of us crocheters!
ReplyDeleteThis hat reminds me of your preschool craft on a paper plate. Both are super cute! I hope you'll come by and share your preschool craft from 2012 on Artsy Play Wednesday (and any other kids' crafts). I wish I had your crochet talent and ability. Your work is beautiful.
ReplyDelete: 0 ) Theresa - Capri + 3
(http://www.multiples-mom.com)
How cute and creative! I love this fishbowl hat! Thank you!
ReplyDelete______
Lee Ann
Crochet...Gotta Love It! Blog
YouTube Channel
#crochetgottaloveit
#crochet
So beautiful! Just the thing I was looking for for my granddaughter! Thank you so much for sharing it!
ReplyDeleteAmanda xx
This is so cute, I actually want this for myself haha. Thanks for sharing this really amazing work :)
ReplyDeleteLove it it so beautiful I will love it for my twins granddaughters thnk u for charing your crochet love it
ReplyDelete